Cylinders on a Z are numbered front to back, left to right, when facing the front of the car,
| Like this: | Back | | | five | six | | three | four | | Pics show this injector--------> | one | two | | Front | |
This article shows injector number one being replaced. The same principles apply to all the injectors. The back two injectors, near the firewall, are a little harder to access because of the long, black skinny balance tube that has to be removed in order to get to injectors numbers five and six. I have a '92 TT. The part numbers are the same for 1990-1994. Part numbers are different for '95-'96 Z's. Read through this article once before you start grinding your Z's upper plenum.
Preferred Tools:
- Dremel brand rotary tool.
- Tungsten carbide cutter bit #9901 or similar metal grinding bit
- Phillips screwdriver, for old injector screws
- Needle nose Vise-Grips for loosening old injector screws
- Metric Allen wrenches, or better yet, ball-end Allen wrench sockets
- 5mm x 14-16mm x 0.8mm stainless steel Allen screws, two per injector
- Shop Vac, micro attachment helpful
- Replacement injector (duh!) and O-rings
- PB Blaster, WD-40, and Vaseline
- Light source
A #225 Flex-Shaft attachment for the Dremel is very helpful, but not essential. This attachment is allows for more room to grind in tight spaces.
Time needed: About two hours the first time, not counting soaking the old injector overnight in PB Blaster for ease of removal.
Difficulty: 2 1/2 out of five. Requires a little finesse.
The Dremel method is not for replacing all your original injectors at once with 150K miles on them. That would be too tedious. Replacing all the injectors at the same time is best accomplished by an upper plenum pull. I had already replaced all my OEM 370cc injectors with a set of NISMO 555cc purple top injectors. Apparently, my NISMOs were not happy with the ethanol in the 94 octane Sunoco gas I had religiously been using, and this was the second 555cc injector that had failed on me. My hopes were that by switching gas, I could save the remaining four injectors, so I used the Dremel method for the two injectors that had failed.
The best theory yet as to why the injectors fail prematurely on '90-'94 z32's is found on this tech sheet from Jim Wolf Technologies.
Bigger injectors don't give more horsepower or more speed. They allow the engine to run at higher boost, with more horsepower, without the air-fuel mixture leaning out from fuel starvation. If the air-fuel mixture is too lean, the engine can detonate and self-destruct.
The injector number really represents a flow rate of cc's per minute. A rough rule of thumb is that the injector size in cc's will support that same number of horsepower at the crank. For instance, 555cc injectors should be able to support almost 555 HP before the fuel requirements of the engine surpass the injector's ability to supply fuel. Most peeps would not want to cut it that close, as an injector is usually considered "safe" up to 90% of its duty cycle.
The Dremel method is named because a small amount of metal has to be ground off the upper plenum above each injector, in order to access one of the two screws that hold each injector in place. So for one or two injectors, when the remainder are expected to be good for quite some time, the Dremel method is a good short-cut. The thought of grinding away a small amount of the aluminum upper plenum creates an anxiety attack in some folks, even though the ground area is small and hidden under the plastic throttle cover.
There is a valid fear of putting a hole in the plenum when using the Dremel. Worst case scenario - a dab of JB Weld and the hole is sealed, although that really should not be necessary unless the person wielding the Dremel gets too cavalier. Purists will always want to pull the plenum, and I can't say I blame them. My car roots tend to be a little bit more on the ghetto side ;c)
Here is a link to an excellent article by "thumper300zx" on the Dremel method that goes into much more detail than here. There is also a link inside that article to yet another excellent write-up on the Dremel method by Chris Fowler for an Infiniti engine, that applies just as well to the z32. There is more than enough information overload in all three articles for the average shade tree mechanic to complete this job. If after looking over all that info you are still hesitant to do the job, then you probably should not attempt it.
First step is to relieve the fuel pressure. My car was ice cold and had been sitting for about a week, so this step wasn't necessary. Letting the car sit overnight also helps relieve the fuel pressure. The quickest and easiest way to relieve the fuel pressure is to remove the fusible link next to the battery for the fuel pump, take off the gas cap, then crank the car a few times. There is also a fuel pump relay in the kick panel next to the driver's left foot, but it is a little harder to access.
<insert pic here of fusible link>
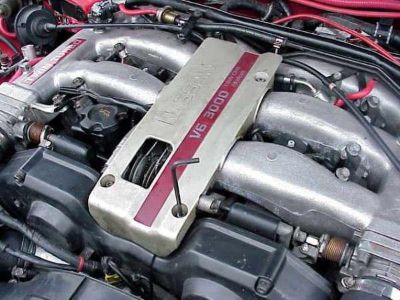 Use a 5mm Allen wrench to remove the four cap screws that hold the throttle cover. Use a 5mm Allen wrench to remove the four cap screws that hold the throttle cover.
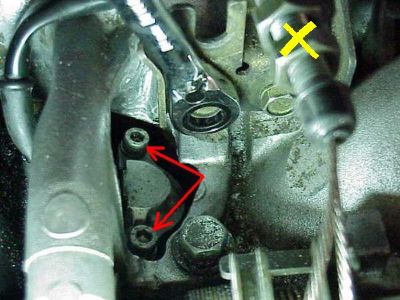 For injector number one, loosen and set aside the throttle and cruise control cables (yellow X). The Gear wrench is on one of the two bolts holding the throttle bracket. For injector number one, loosen and set aside the throttle and cruise control cables (yellow X). The Gear wrench is on one of the two bolts holding the throttle bracket.
Remove the oil filler cap for more room to work. Stick a rag in the oil filler hole so metal filings don't get inside the engine.
The red arrows above are pointing to the two Allen screws holding in injector number one. I had the original Phillips screws replaced with stainless steel Allen screws during a previous injector swap. The Allen screws are easier to access and remove, and are less likely to strip. The only way some of my original Phillips screws came loose was by using needle nose Vise-Grips and a screwdriver at the samet time. An impact driver works well for some folks. If the original Phillips screws are stripped, then the upper plenum may need to come off.
I know at least five different ways to test an injector. Using a long slotted screwdriver like a mechanic's stethoscope, my bad injector sounded different than the other injectors, although is was still clicking. The faulty injector also had an abnormal power balance test, and ohm tested out of range. All three of those diagnostic tests took less than ten minutes to complete. I felt certain I had isolated the bad injector.
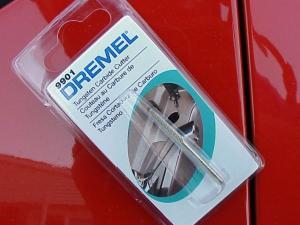 |  | #9901 tungsten
carbide cutter bit | tool after which this technique is named |
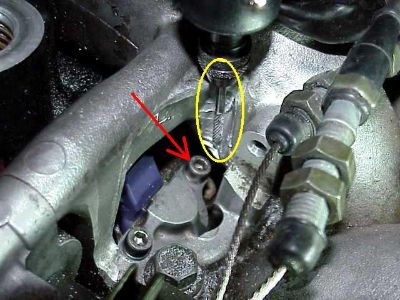 The yellow circle is around the Dremel cutter bit and plenum area that is being ground. The red arrow shows the Allen screw that needs to be removed after the grinding. The yellow circle is around the Dremel cutter bit and plenum area that is being ground. The red arrow shows the Allen screw that needs to be removed after the grinding.
 Helps to have someone suck the metal filings as you're grinding. This Shop-Vac micro attachment came in handy for that. Helps to have someone suck the metal filings as you're grinding. This Shop-Vac micro attachment came in handy for that.
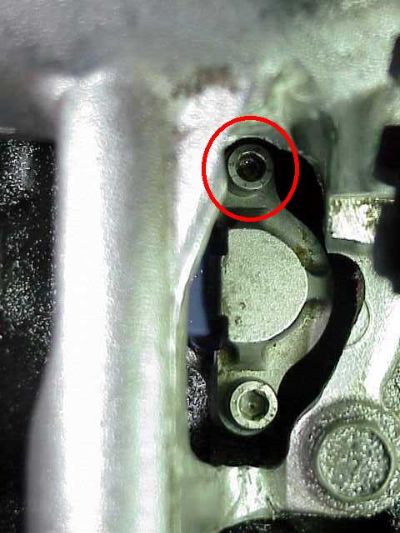 I liked looking straight down over the injector cap screw to check this angle between grinds. This line of sight was quite accurate at predicting when the screw would come out. You can always take more metal off so grind a little, stop, check and recheck. I liked looking straight down over the injector cap screw to check this angle between grinds. This line of sight was quite accurate at predicting when the screw would come out. You can always take more metal off so grind a little, stop, check and recheck.
I went through at least ten cycles grinding and rechecking before my Allen wrench would easily fit into the screw. Remove the screw on the "easy" side of the injector first, which gives a little more fudge room on the Dremel side.
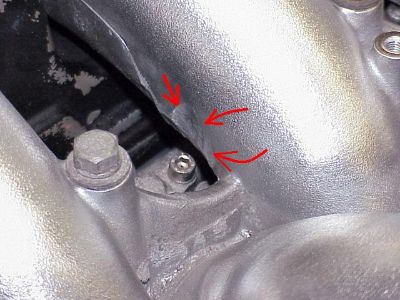 Here is a pic showing the slight amount of plenum that had to be Dremel'd over injector #3 on an earlier job, much less than for injector #1. Here is a pic showing the slight amount of plenum that had to be Dremel'd over injector #3 on an earlier job, much less than for injector #1.
.
 Getting a little gentle leverage on the cap screw with a long Allen wrench and a pair of pliers. Don't strip the screw. See the last pic in this article of the "ball-end" Allen wrenches. Getting a little gentle leverage on the cap screw with a long Allen wrench and a pair of pliers. Don't strip the screw. See the last pic in this article of the "ball-end" Allen wrenches.
If the screw won't turn, soak it in PB Blaster and come back hours later, or even the next day. Being in a hurry can mess this job up.
 Using Allen screws makes installation and removal easier than the OEM Phillips screws. Using Allen screws makes installation and removal easier than the OEM Phillips screws.
These screws were 5mm head x 16mm length x 0.8mm pitch stainless steel Allen screws. The exact length of the screw is not critical, 14mm works. The fine pitch is fairly standard.
Nissan also sells replacement slotted hex cap screws for this purpose that will take a socket wrench in addition to a screwdriver. The part number is 08360-51862, for a little less than a buck a piece. Hardware store screws are cheaper, but be sure and get stainless steel, and not something that will rust in place.
 Screws are out, half-moon cap is off, injector needs to be pulled out. I soaked the injector for 24 hours with PB Blaster at this stage before trying to pull it out, and it came out easily. Screws are out, half-moon cap is off, injector needs to be pulled out. I soaked the injector for 24 hours with PB Blaster at this stage before trying to pull it out, and it came out easily.
When in doubt, soak with PB Blaster.
 This is how I grabbed the injector for both removal AND insertion. I padded the pliers with a rag when pushing the new injector back in. This is how I grabbed the injector for both removal AND insertion. I padded the pliers with a rag when pushing the new injector back in.
Twist the injector back and forth a little whenever trying to remove or replace it, don't just push or pull. My faulty injector came out fairly easy. Expect older injectors and original Phillips screws to come out much harder. We had to pull my upper plenum and use Vise-Grips to get my original injector screws out the first time around.
Other methods include using a screwdriver with a strap wrench attached to the handle for more leverage, or using a manual impact driver. I've pounded on the handle of a screwdriver before and used it as a ghetto impact driver, but that's probably not such a great idea, other than it worked.
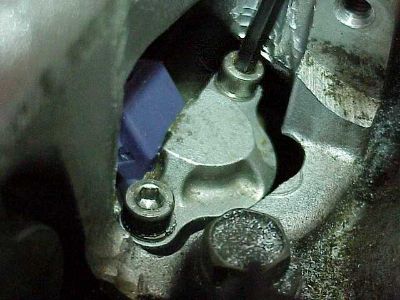
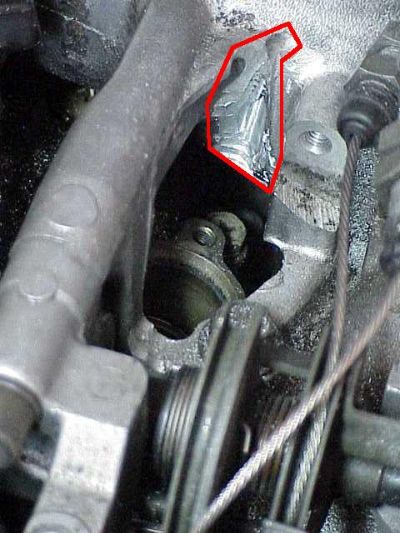 Injector removed, screws are out and half moon cap is removed. Red polygon shows the small area of the upper plenum that was ground with the Dremel. I guesstimate less than two millimeters thickness was removed. Injector removed, screws are out and half moon cap is removed. Red polygon shows the small area of the upper plenum that was ground with the Dremel. I guesstimate less than two millimeters thickness was removed.
There is a rubber lower insulator in the bottom of the injector socket that is not seen. With the Dremel method, that rubber insulator has to reused, which in usually not a problem.
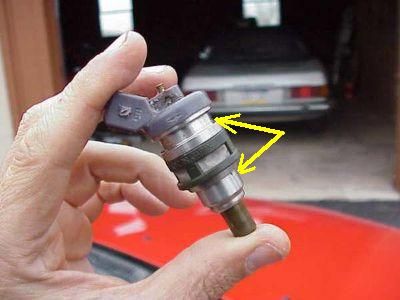 Side view of same "purple top" Nismo 555cc injector, roughed up a little bit at the top from removal. Side view of same "purple top" Nismo 555cc injector, roughed up a little bit at the top from removal.
The plastic pintle cap touching my thumb is not necessary in order for the injector to function properly. Some folks who buy used injectors report the pintle cap missing.
The arrows show where the O-rings go. I coated the O-rings with Vaseline and squirted the injector socket in the lower plenum with WD-40 before insertion.
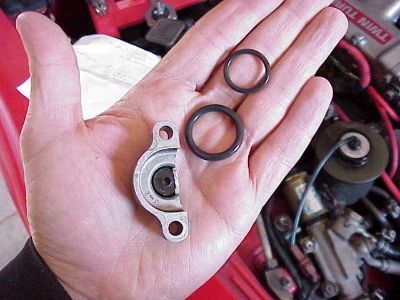 The small O-ring goes on the lower part of the injector. The larger one installs from the top of the injector. The small O-ring goes on the lower part of the injector. The larger one installs from the top of the injector.
The half-moon cap has a small rubber insulator on the underside that should also be replaced.
For 90-94 injectors, the part numbers are 16618-10V00 for the small lower O-Ring, 16618-10V05 for the large upper O-ring and 16635-10V02 for the little rubber upper insulator for the underside of the half-moon metal cap. There is a rubber insulator in the lower plenum where the injector seats that cannot be changed out with the Dremel method. That is usually not an issue. Changing the lower rubber insulator 16635-10V10 requires a plenum pull.
I found pressing the new injector in to be harder than pulling the old one out, maybe because I was more worried about damaging the new injector. They injectors aren't cheap, usually around $160 a pop. TT.net member Audioquest uses a 5/8" piece of PVC pipe to push the injector back in place. He cuts a notch in the pipe to go over the electrical connector on top of the injector.
The most common problem peeps encounter when installing injectors, by whatever method, is pinched or kinked O-rings. The best way to avoid this is to use Vaseline on the O-rings, and be sure to twist and push the injector in place. The chance of the O-rings pinching are much greater if the force on installing the injector is just straight down. Symptoms of a pinched O-ring after an install are a the same as those for a bad injector, plus usually a leak around the injector and a strong smell of gas. This can cause an engine fire.
Longer Allen screws can come in handy for re-seating the injector by slowly tightening the cap in place on top of the new injector, although this sort of goes against the "don't push straight down" rule. A fellow Z owner E-mailed me that his injector kept popping back up after he pushed it down. For him, pressing the injector in place by tightening the cap screws worked great. However, the aluminum is very soft and the screws can be easily cross-threaded, so don't force it.
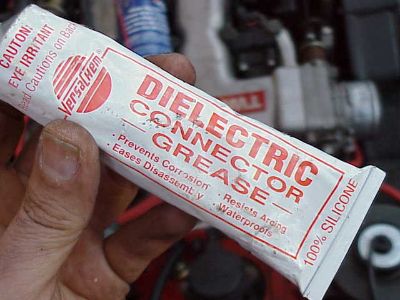 Use this stuff whenever putting electrical connectors back together, such as when hooking the fuel injector back up to the engine harness. Use this stuff whenever putting electrical connectors back together, such as when hooking the fuel injector back up to the engine harness.
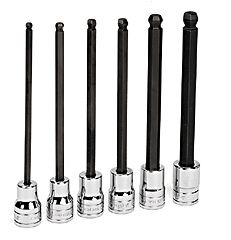 These are ball-end Allen wrench sockets. I learned about these tools after I did the work. The ball-end allows for even more fudge room and angling, and therefore less grinding than a straight Allen wrench. I now own a set. These are ball-end Allen wrench sockets. I learned about these tools after I did the work. The ball-end allows for even more fudge room and angling, and therefore less grinding than a straight Allen wrench. I now own a set.
|