The air induction valves (AIV's) only exist in the z32 models 1990-1992. The AIV's are part of idle emissions control. They introduce air into the exhaust before the catalytic converters so that the "cats" will work cooler and more efficiently. Removing the AIV's with a stock ECU chip in place can give problems passing state inspections for emissions at idle. The car will still run the same with or without the AIV's. The instructions here are for discussion purposes only, and not intended as a recommendation or endorsement for doing anything illegal to a car that might cause an increase in air pollution. Please review this site's Disclaimer.
There is an AIV solenoid along with a tangle of vacuum tubing under the hood. The AIV's themselves are in the front fender wells, behind the wheels. The plastic fender liners are peeled back to access the AIV's. There is AIV metal tubing or so called "air tubes" that run from the AIV's to the exhaust midpipes under the car, connecting just upstream from the catalytic converters. There are AIV air tanks deep in the fender wells. Most people, including me, just leave the air tanks alone unless the fenders are already off for some other reason.
The AIV's seem to come to the attention of Z owners either when their exhaust system or ECU chip is being upgraded. Many aftermarket mid-pipes or test pipes do not have bungs to connect the AIV "air tubes" to the exhaust. That is the perfect time to delete the entire AIV system. Then there will not be any plugged holes or capped tubing to catch unwanted attention during a visual inspection. When upgrading the exhaust, be aware whether or not the new midpipes have bungs for the AIV air tubing. Removing or deleting the AIV's while the stock midpipes are still in place is harder, but can still be done. Making sure the car can still pass a visual inspection should be a priority.
All the aftermarket ECU (Electronic Control Unit) chips of which I am aware delete the AIV function. I have a Jim Wolf Technologies ECU chip, so the AIV's in my car were just taking up space and weight. After I installed my chip, I disconnected the and removed the AIV solenoid under the hood, and cut the vacuum lines from the solenoid at the right and left fenderwells leading to the AIV's. The AIV vacuum lines are T'd into I drove around like this for a couple of years before I finally got around to removing the AIV's units themselves, when I had the car on jack stands for some other reason.
The AIV's are out of sight, so leaving them in place after a chip upgrade is acceptable, no harm, no foul. Getting rid of the AIV solenoid and vacuum hoses under the hood does clean up things a bit. My overall philosophy is to simplify the engine bay as much as possible, and getting rid of the AIV's themselves does help the heavy Z lose five or six pounds. However, if passing a visual inspections is critical for your Z, then you can simply leave the system in place. If in doubt, leave it alone.
The following pic is under the hood, just in front of the battery.
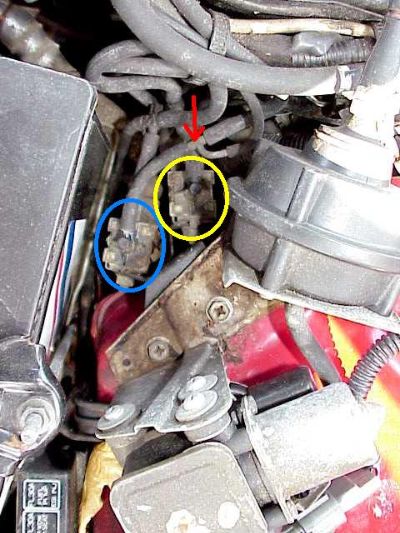 The two solenoids circled are identical. The manner in which they are hooked up to the vacuum lines and the electrical engine harness determines their function. The blue circle is around the AIV solenoid, closer to the battery. The yellow circle is around the EGR solenoid. Tracing the vacuum lines from the AIV solenoid shows that they will disappear into both front fender wells. The red arrow points to a T-connector the AIV solenoid shared with the boost sensor. The two solenoids circled are identical. The manner in which they are hooked up to the vacuum lines and the electrical engine harness determines their function. The blue circle is around the AIV solenoid, closer to the battery. The yellow circle is around the EGR solenoid. Tracing the vacuum lines from the AIV solenoid shows that they will disappear into both front fender wells. The red arrow points to a T-connector the AIV solenoid shared with the boost sensor.
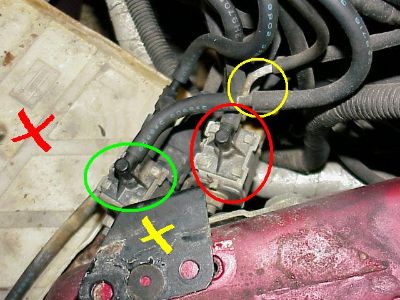 Better picture of the solenoids with the battery out. The green circle is around the AIV solenoid. The red X is on the battery tray. The mounting bolts on the yellow X have been removed. Better picture of the solenoids with the battery out. The green circle is around the AIV solenoid. The red X is on the battery tray. The mounting bolts on the yellow X have been removed.
The yellow circle shows the same metal T that shares vacuum line coming from the top of the AIV solenoid with the boost sensor, on the other side of the engine bay.
Hook the boost sensor vacuum line directly to the balance tube after the AIV solenoid is removed so the stock boost gauge inside the cabin will still work. There is a pic of this below, two pics down.
The AIV solenoid is also T'd into the one of the vacuum lines coming off the EGR solenoid next to it. Simply remove the T and replace with a single vacuum line for the EGR connection. I used a scavenged vacuum line from the AIV solenoid that was no longer needed.
The engine harness connector to the AIV solenoid is black, and the EGR connector is white. The connectors are deep under the vacuum lines, and cannot be seen in the above pic, but they are not hard to access. You can remove the battery for more to work but that is usually not necessary. The black AIV connector can be left dangling after it is unplugged, and will not cause the ECU to throw any error codes.
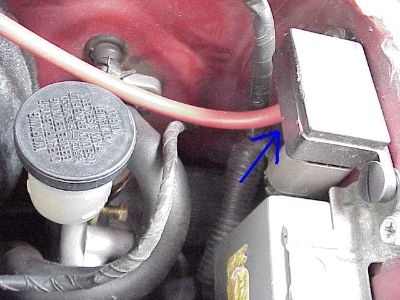 This is the boost sensor on the driver side of the engine bay, near the firewall. The red vacuum line shown runs all the way across the firewall and T's into the AIV vacuum line. This is the boost sensor on the driver side of the engine bay, near the firewall. The red vacuum line shown runs all the way across the firewall and T's into the AIV vacuum line.
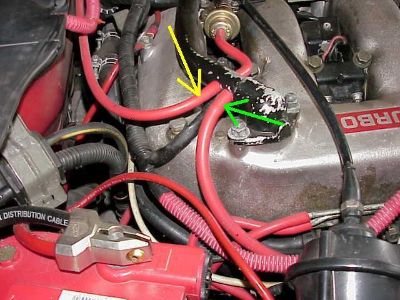 After the AIV solenoid is removed, the boost sensor vacuum line is simply attached directly to the same place at the balance tube, shown by the yellow arrow. After the AIV solenoid is removed, the boost sensor vacuum line is simply attached directly to the same place at the balance tube, shown by the yellow arrow.
The vacuum line at the green arrow above goes untouched. Someone wrote me and asked to me to show where that vacuum line at the green arrow goes to, so here it is:
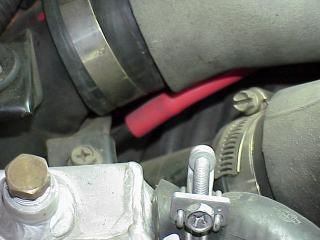 Tracing the vacuum line at the green arrow forward shows that it is connected to a nipple under the outside passenger intercooler hose. That is the radiator in the left lower corner. The front of the car is to the left. The nipple leads to the passenger side recirculation valve. Tracing the vacuum line at the green arrow forward shows that it is connected to a nipple under the outside passenger intercooler hose. That is the radiator in the left lower corner. The front of the car is to the left. The nipple leads to the passenger side recirculation valve.
The AIV's are hidden behind the wheel wells. First, you must remove the front wheels. Then peel open the back of the fender liner. Several screws and plastic fasteners will have to be pried loose in order to remove the fender liners. Some of these plastic fasteners will undoubtedly get trashed in the process, but they can be replaced by screws or generic plastic auto body fasteners from your neighborhood Lowe's.
Start at the back of the black plastic fender liner, toward the rear of the car and at the bottom, closest to the ground. Peel the liner back just enough to reveal the AIV's. The entire fender liner does not have to come out, just peel it out of the way and wedge it behind the brake disc.
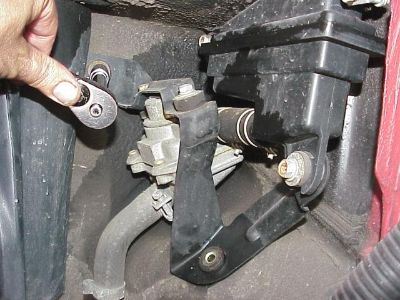 Behind the plastic wheel well liners of both front wheels, lie the AIV's. This is the drivers' side. The units are easily liberated by removing several ten millimeter bolts, and a hose clamp or two. Behind the plastic wheel well liners of both front wheels, lie the AIV's. This is the drivers' side. The units are easily liberated by removing several ten millimeter bolts, and a hose clamp or two.
The moisture on the above AIV was a leaky shock that had to be replaced.
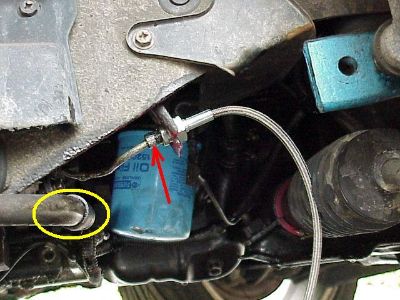 Passenger side wheel is removed. The Yellow circle shows the AIV tube that sticks out under the car. The red arrow is pointing to a partially installed SS clutch line. Passenger side wheel is removed. The Yellow circle shows the AIV tube that sticks out under the car. The red arrow is pointing to a partially installed SS clutch line.
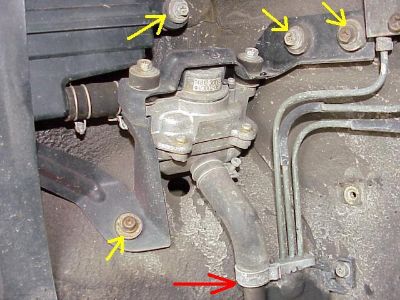 Passenger side AIV showing four bracket bolts that need to be removed. Passenger side AIV showing four bracket bolts that need to be removed.
If the AIV is still connected to a stock mid-pipe system, then the end of the metal pipe shown by the red arrow must be capped in order to prevent an exhaust leak. I did this for a friend and simply used a giant bolt and washer with some high temp RTV sealant. This will preserve a normal visual appearance for the AIV system as viewed from under the car, once the fender liners are back in place.
Another option is to disconnect and remove the AIV tubing at the mid-pipe, although this can be a b*tch to do after years of being baked by exhaust heat. This will leave a threaded bung hole in the midpipe that needs to be plugged. To get the original metal tubing out of the mid-pipe usually requires a torch.
A knowledgeable inspector may notice the plugged bung hole in the exhaust as a deleted AIV system, and flunk the car at inspection. Don't take the car to the dealer to be inspected, and 90 percent of the time that won't be an issue. I hear California can be quite tough on this, though.
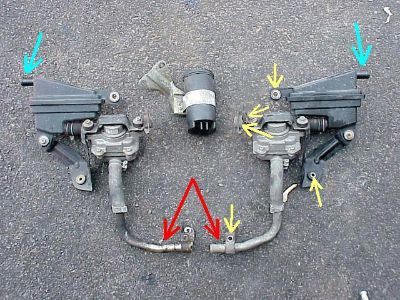 Yellow arrows show where the bracket bolts for one AIV. The blue arrows are where a hose clamp was loosened. The cylinder in the middle is the PRVR canister. Yellow arrows show where the bracket bolts for one AIV. The blue arrows are where a hose clamp was loosened. The cylinder in the middle is the PRVR canister.
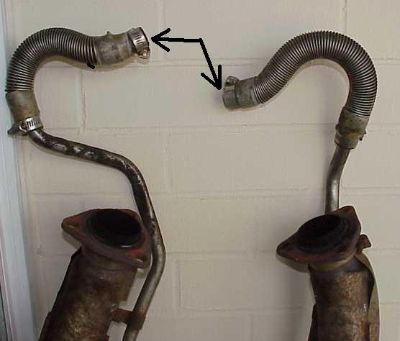 The tubing at the red arrows in the above pic were connected to these coil covered rubber hoses underneath the car. The rubber hoses are connected to the exhaust midpipes by metal air tubes. The tubing at the red arrows in the above pic were connected to these coil covered rubber hoses underneath the car. The rubber hoses are connected to the exhaust midpipes by metal air tubes.
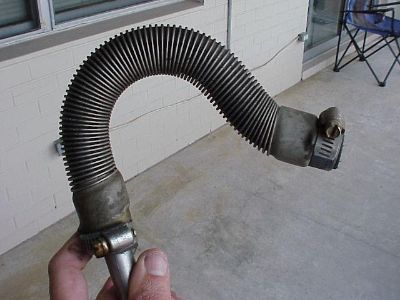
My midpipes just happened to be out of the car for these pics. All the work described here can be done with the exhaust midpipes still attached to the car. The car will need to be on a lift or at least up on jacks.
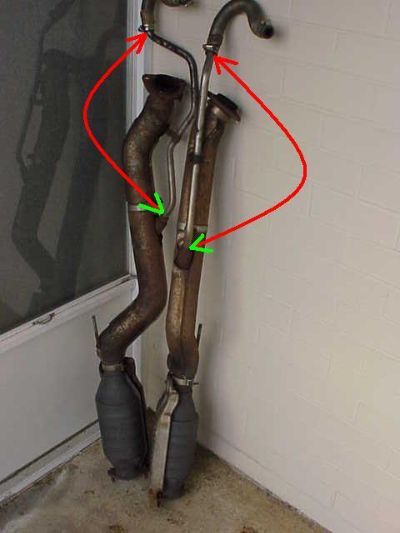 The red arrows show the stock AIV "air tubes" connected to the midpipes. The catalytic converters are at the bottom on the ground. Exhaust flow is from top to bottom. The nut at the green arrow can be very hard to break loose. A torch helps. If the air tubes are removed, the hole in the exhaust pipe must be plugged or capped. The red arrows show the stock AIV "air tubes" connected to the midpipes. The catalytic converters are at the bottom on the ground. Exhaust flow is from top to bottom. The nut at the green arrow can be very hard to break loose. A torch helps. If the air tubes are removed, the hole in the exhaust pipe must be plugged or capped.
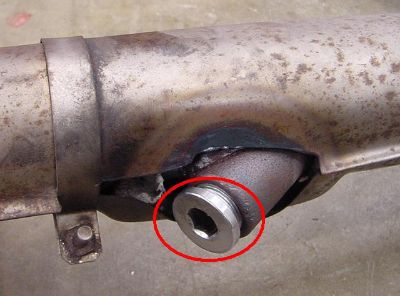 Close-up of the stock midpipes with the air tubes removed, and the bung hole plugged. The plugs shown in the pic can be ordered from a friend of mine on a separate web site. Close-up of the stock midpipes with the air tubes removed, and the bung hole plugged. The plugs shown in the pic can be ordered from a friend of mine on a separate web site.
The EGR Delete Kit on that same web site is for a different system.
I have aftermarket midpipes with high flow cats, which eliminated the bung hole for the AIV air tubing. This kept the appearance of my exhuast clean without any plugged holes or capped tubing, that could get some unwanted attention during a visual inspection. Some aftermarket midpipes or test pipes have bung holes to keep the AIV's.
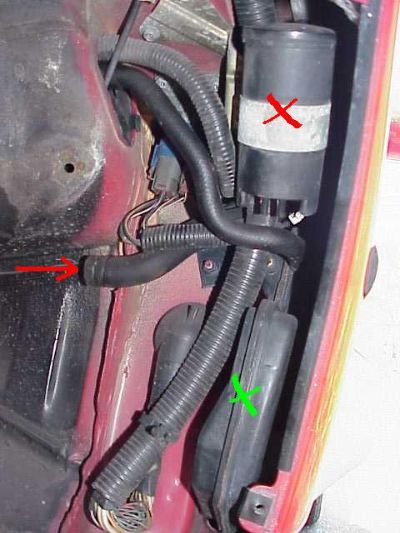 The red arrow is a hose where the AIV was disconnected in the driver fender well. Five pictures up, the blue arrow on the AIV was attached here. A hose clamp was removed. The red X is the PRVR canister. The green X is the clutch vacuum assist tank. The red arrow is a hose where the AIV was disconnected in the driver fender well. Five pictures up, the blue arrow on the AIV was attached here. A hose clamp was removed. The red X is the PRVR canister. The green X is the clutch vacuum assist tank.
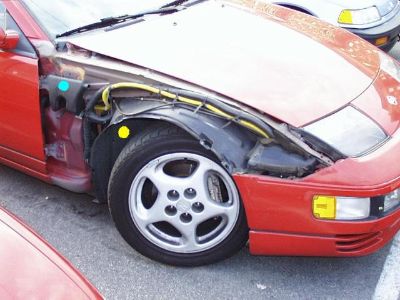 The above hose at the red arrow is attached at the other end to an air tank behind the fender well. This is the passenger side example. The blue dot shows the AIV air tank. The above hose at the red arrow is attached at the other end to an air tank behind the fender well. This is the passenger side example. The blue dot shows the AIV air tank.
In order to remove the entire AIV system, the fenders have to come off to get to these air tanks. Do not bother to go to this much trouble unless the fenders are already off for some other reason.
The AIV's are now deleted. The car will run the same as long as there are not any open vacuum connections.
| 