If the stock boost gauge on the dash stops working, but the car still feels like it's boosting, then the problem is probably a cracked or split boost hose at the boost sensor.
 The black box next to the blue arrow is the boost sensor. The hose can look fine, but when it goes bad, it's usually cracks where it attaches right at the box. You have to remove the hose to check it. A temporary fix is to just trim a quarter inch or so off the end of the hose then reattach it. The black box next to the blue arrow is the boost sensor. The hose can look fine, but when it goes bad, it's usually cracks where it attaches right at the box. You have to remove the hose to check it. A temporary fix is to just trim a quarter inch or so off the end of the hose then reattach it.
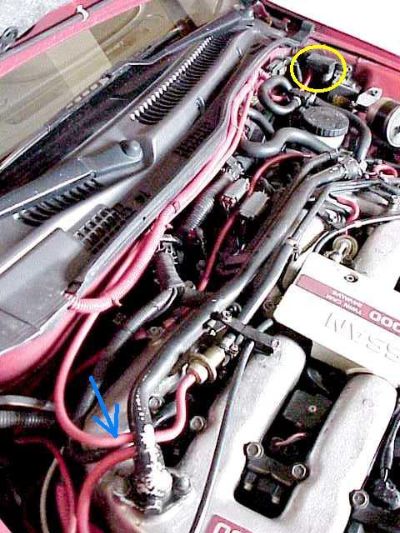 The yellow circle is the same boost sensor shown above. I used 6mm red silicone hose to replace my stock cracked rubber hose. Just remove the old hose, cut the new hose to length and replace in less than five minutes. The yellow circle is the same boost sensor shown above. I used 6mm red silicone hose to replace my stock cracked rubber hose. Just remove the old hose, cut the new hose to length and replace in less than five minutes.
 The yellow arrow is a close up of the boost hose connected to the balance tube on the passenger side. If the car still has AIV's, it will look different since there will also be a T-connector splicing a hose from the AIV solenoid into the same nipple. The yellow arrow is a close up of the boost hose connected to the balance tube on the passenger side. If the car still has AIV's, it will look different since there will also be a T-connector splicing a hose from the AIV solenoid into the same nipple.
The vacuum line at the green arrow above leads to the passenger side recirculation valve, at the front of the car.
Yeah, I realize my balance tube is all scratched up. Maybe I will get it powder coated one of these days.
A more preferable option may be to use this nipple off of the driver's side of the balance tube, which is much closer to the boost sensor, shown capped below.
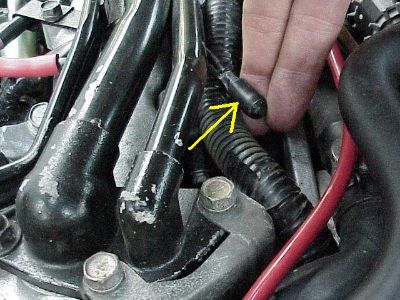 This hardline off of the balance tube is in line and very close to the boost sensor. The nipple was freed up by first eliminating the carbon cannister. This hardline off of the balance tube is in line and very close to the boost sensor. The nipple was freed up by first eliminating the carbon cannister.
This alternate hook-up for the boost sensor accomplishes three things. First, the boost sensor hose becomes much shorter, which is presumably better for boost gauge response. Second, there is much less hose to develop leaks. Finally, the stock nipple where the boost hose used to be attached, on the far side of the balance tube, is a more natural choice for a connection to an aftermarket vacuum operated boost gauge. The nipple on the passenger side is in a good location to use for a boost gauge that needs a vacuum line run through the firewall to the interior. Of course, if you're hooking up an aftermarket boost gauge, then you may no longer be concerned about your stock boost sensor hook-up ;c)
Clear as mud?
|