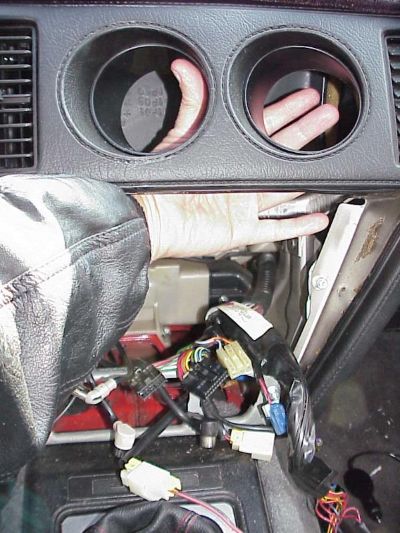
By "center dash" I meant all the "stuff" shown in the picture. The dash lights were out everywhere there was an arrow, including the LCD screen on the climate control. Also, I had blown the "audio" fuse in the kick panel next to the driver's foot, but the stereo still would not work after I replaced that fuse, so I needed to pull the stereo head unit (HU). Finally, the lenses over the round analog turbo and oil gauges had gotten cloudy and pitted over the years, and I wanted to polish them clean. In order to get the gauges out, the climate control and stereo HU had to come out first.
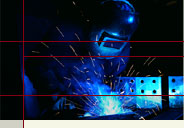
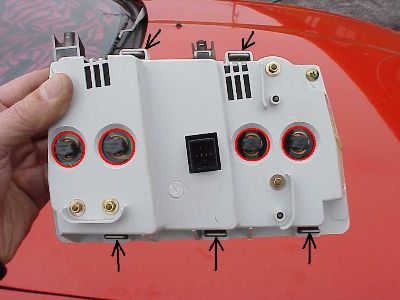
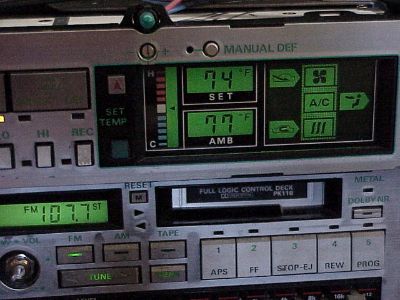
 Look closely at the left round gauge and some pitting can be seen on the plastic lens surface. This would not come off with simple cleaner. The bottom arrows are pointing to the climate control with LCD readouts that were not working. Look closely at the left round gauge and some pitting can be seen on the plastic lens surface. This would not come off with simple cleaner. The bottom arrows are pointing to the climate control with LCD readouts that were not working.
I could read the LCD screens if I shined a flashlight on them so I felt the problem was caused by burnt out bulbs behind the screen, and not the screen itself.
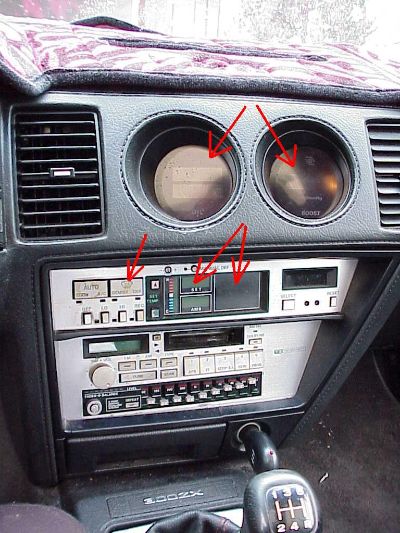
 Remove the ashtray. Unscrew four Phillips screws where circled. Slide out this trim bezel. There are three electrical connections to this piece. Two go to the lighter, one is the ashtray lightbulb. Remove the ashtray. Unscrew four Phillips screws where circled. Slide out this trim bezel. There are three electrical connections to this piece. Two go to the lighter, one is the ashtray lightbulb.
Next, the stereo HU, climate control, and mounting bracket will come out as one unit. Remove the four Phillips screw bolts that connect the the mounting bracket to the dashboard. Reach in underneath through the hole where the ashtray was and behind the stereo HU and slide the entire unit forward. The stereo HU, climate control, and mounting bracket will come out together. Disconnect all the harness clips behind the stereo and climate control. There are a lot of connections to keep track of, but it's not that hard to keep them straight. Basically, all of them will only go back in one place. Make sure none of the wires and connectors fall back behind the dash where they could be missed during the reinstall.
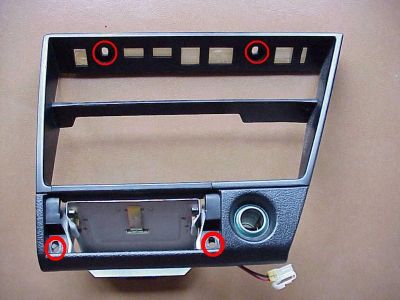
 To remove the gauge cluster, look at the bottom of the cluster through the opening left from removing the HU and climate control. Remove these two Phillips screws. To remove the gauge cluster, look at the bottom of the cluster through the opening left from removing the HU and climate control. Remove these two Phillips screws.
The cluster should drop down and can be easily removed after the harness is disconnected in the back.
 Center area of dash should look like this after removing the gauges, climate control, and stereo HU. Center area of dash should look like this after removing the gauges, climate control, and stereo HU.
 Back of stereo HU had a small 3 amp fuse that was held in place by a clip, circled in red. Fuse was blown and needed to be replaced. Back of stereo HU had a small 3 amp fuse that was held in place by a clip, circled in red. Fuse was blown and needed to be replaced.
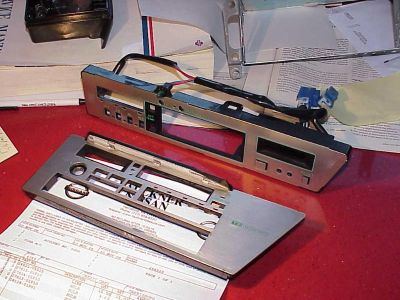 Unscrew the faceplates from the stereo HU and the climate control. Don't forget the nut behind the volume control knob on the HU faceplate. Unscrew the faceplates from the stereo HU and the climate control. Don't forget the nut behind the volume control knob on the HU faceplate.
There were four screws behind the climate control faceplate, including two behind the clock. For the stereo faceplate, other than the nut over the volume control knob there was only one screw, behind the upper right corner.
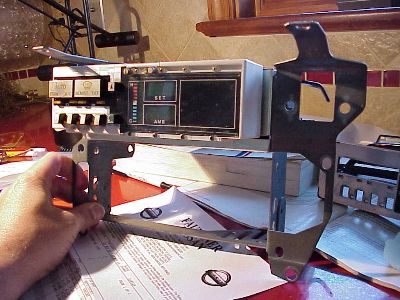 Remove all the side mounting screws for the stereo HU and slide the HU out the back of the bracket. The climate control can stay in the bracket for the purpose of changing the bulbs. Remove all the side mounting screws for the stereo HU and slide the HU out the back of the bracket. The climate control can stay in the bracket for the purpose of changing the bulbs.
I delivered the stereo HU to a repair shop for a refurbish. For years, the volume was scratchy and the right channel would intermittently go out. This would be the second refresh on this unit. I was tempted to upgrade the HU but I love the OEM look and the built in graphic equalizer.

Flip the climate control upside down while still in the bracket. Remove the four small screws holding the white cover in place and and expose the circuit board as shown. Static electricity precautions should be taken. That means grounding yourself or at least discharging your finger on a metal grounded object before going near the cirucuit board.
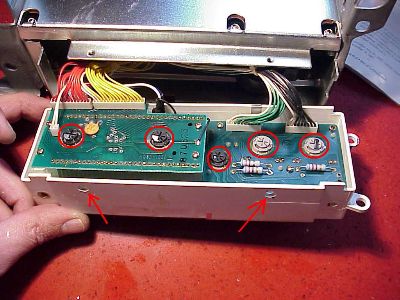 Remember, the view in this pic was with the climate control flipped upside down before removing the faceplate. Remember, the view in this pic was with the climate control flipped upside down before removing the faceplate.
The five bulbs that light the climate control panel are circled in red above. The bases of the bulbs were two different colors, gray or black. The bulbs gently twisted free with a screwdriver. My Nissan dealer was able to get replacement bulbs for me. I had to specify "orange" or "green" for the bulbs. All my bulbs lenses were green. Bulb count so far = five.
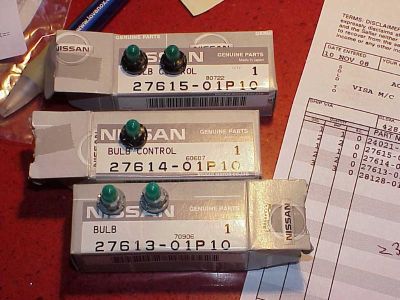 I put the two 27615's on the left side of the above pic, behind the LCD screen. The two 27613's with the gray bases went on the right side, and the 27614 in the middle. I put the two 27615's on the left side of the above pic, behind the LCD screen. The two 27613's with the gray bases went on the right side, and the 27614 in the middle.
I believe the black 27615's and the black 27614 to be identical, but have a different part number only because they light a different area of the faceplate. Nissan part numbers can be funny that way.
The new bulbs were a tight fit, much tighter than the old bulbs that came out. Use a screwdriver that is big enough so as to not strip the soft plastic bases. Replace the front white cover to the climate control.
 The faceplate to the climate control had three little green wedge bulbs that were all burned out, which I replaced. The part number for these bulbs was 28128-01P01. The faceplate to the climate control had three little green wedge bulbs that were all burned out, which I replaced. The part number for these bulbs was 28128-01P01.
Subtotal on bulb count so far = eight. The light bulbs on the climate control faceplate above can be tested by reconnecting the harness to the car before the remainder of the reinstall.

While I was waiting for the stereo HU to get back from the shop I finished the gauge cluster.
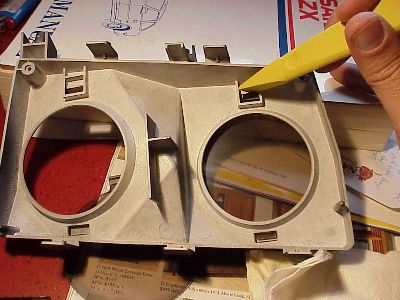
 This is the back of the turbo and oil gauge cluster. The four bulbs are circled in red. In order to clean the lenses, remove the faceplate by gently prying the prawl clips at the black arrows. The faceplate does not need to be removed to change out the bulbs. This is the back of the turbo and oil gauge cluster. The four bulbs are circled in red. In order to clean the lenses, remove the faceplate by gently prying the prawl clips at the black arrows. The faceplate does not need to be removed to change out the bulbs.
 Carefull pry the lenses free from the faceplate. Carefull pry the lenses free from the faceplate.
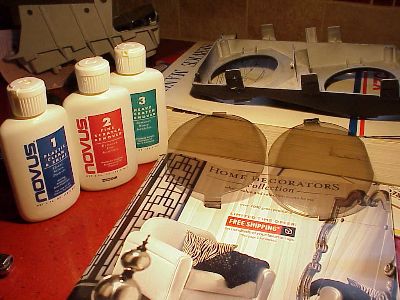 Lenses after polishing and cleaning, looked like new again. I wish I would have taken a "before" picture to show how crudded up the lenses were before I cleaned them. Lenses after polishing and cleaning, looked like new again. I wish I would have taken a "before" picture to show how crudded up the lenses were before I cleaned them.
NOVUS product is a plastic polish and scratch remover, used in three stages. I have used it over the years with great results on small projects. Price varies a lot, so shop around.
The bulbs in the back of the gauge cluster were easily unscrewed by hand.
 Here's what one of the four black bulb sockets looked like when unscrewed from the back of the gauge cluster. The bulbs were wedge style and pulled straight out from each socket with a little forceful wiggling. Here's what one of the four black bulb sockets looked like when unscrewed from the back of the gauge cluster. The bulbs were wedge style and pulled straight out from each socket with a little forceful wiggling.
 Clean the bulb contacts behind the gauge with an eraser. Don't let any crumbs fall into the holes. Clean the bulb contacts behind the gauge with an eraser. Don't let any crumbs fall into the holes.
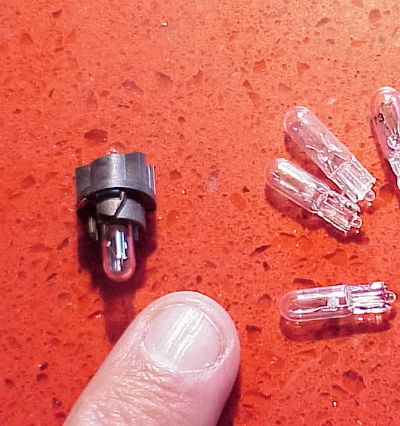
 The original Nissan bulb is on the left next to my finger. This bulb was no longer available (NLA) from the dealer. I went to my friendly neighborhood electronics store and found a close match shown on the right. The original Nissan bulb is on the left next to my finger. This bulb was no longer available (NLA) from the dealer. I went to my friendly neighborhood electronics store and found a close match shown on the right.
The replacement bulbs were a little smaller and narrower, but I wasn't in the mood to be too picky. We tested the bulbs in the socket at the electronics store with a 12V source. They fit, and they lit, and that was good enough for me.
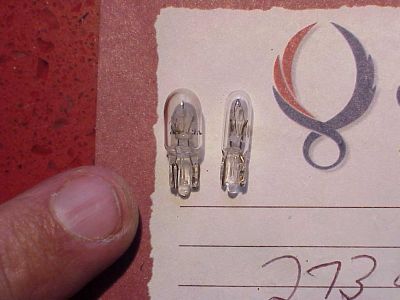
Funny thing, of the four original Nissan burnt bulbs I pulled out from behind the gauges, two were unmarked, one was labeled "73" and the other was labeled "A14V3WXL." I only list that in case it helps the reader in any search for new bulbs.
The replacement bulbs were listed as "T1- 3/4 sub wedge 14V, 0.1A" bulbs for around a buck each. Thanks to my friends at Cumberland Electronics for helping me pick out the bulbs. Mark at the sales desk was super nice and helpful.
Since the replacement bulbs were smaller and narrower, they did not fit as snug into the sockets. After my first test install in the car, the lights would flicker when I tapped on the gauge housing, which was unacceptable.
So I pulled the gauge cluster again, and removed the sockets and bulbs. Then with a sharp probe, I GENTLY pried the copper contacts inside each socket a little closer together. Don't break these or you are screwed. I also GENTLY pulled the two wires away from the base of each bulb so they would make better contact with the copper contacts inside each socket. I reinstalled the gauge and this time the lighting was rock solid, without a flicker. The gauge lights should come on with the headlight switch turned on without the keys, or with the headlight switch off and the ignition on.
Total number of bulbs replaced = twelve.
The top of the gauge cluster has two posts that insert easily with a blind stab into holes built in behind the dash. I had the gauges reinstalled and working days before I reinstalled the stereo HU and climate control.
After I got my head unit back from the stereo shop, the install was a straightforward reversal of the above steps.
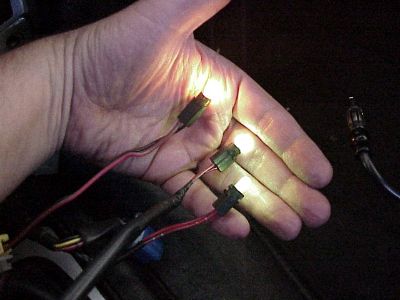 Testing new bulbs on the car side of the harness. All these bulbs look white in the pic but two were green bulbs for the back of the climate control, plus one white bulb for the ashtray. Testing new bulbs on the car side of the harness. All these bulbs look white in the pic but two were green bulbs for the back of the climate control, plus one white bulb for the ashtray.
 Climate control and head unit reinstalled in mounting bracket, ready to drop in the car. Notice the new green bulb on top of the climate control. The rest of the bulbs are hidden. Climate control and head unit reinstalled in mounting bracket, ready to drop in the car. Notice the new green bulb on top of the climate control. The rest of the bulbs are hidden.
Reconnecting all the harnesses behind the climate control and head unit can be a little tricky, but no big deal. I like to connect the longer wires first, and work long to short.
 After the connectors are all back together, good idea to test the units before the final install by turning on the power. Looked good. After the connectors are all back together, good idea to test the units before the final install by turning on the power. Looked good.
Now all my my interior gauges and lights work, including my digital dash. The look is great when driving around at night. I believe this interior represents the pinnacle of digital 80's dashboard and interior styling. I consider it ironic and a sign of how long the digital age has been around that such a "high tech" interior is found in a "classic" car.
|