AIV stands for Air Induction Valve. The AIV exists to contol idle emissions. The AIV introduces air into the exhaust before the catalytic converters so that the "cat" will work cooler and therefore more efficiently. A Z will run the same with or without the AIV. Passing idle emissions (electronic sniffer test) without the AIV may be a problem unless an aftermarket ECU (computer chip) has been installed which deleted the AIV function.
Assuming a mechanic knows where to look, the car will not pass a visual inpsection after the AIV is deleted. The instructions here are for discussion purposes only, and not intended as a recommendation or endorsement for doing anything illegal to a car that might cause an increase in air pollution. Please read this site's Disclaimer.
First dentify all the bolts that needed to be removed, and soak them with PB Blaster the night before. All of the bolts then came off easy the next day.
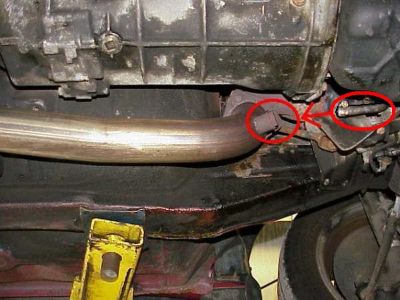 After installation of my aftermarket exhaust, the AIV, or "air tube" was cut, and no longer connected to the downpipe. After installation of my aftermarket exhaust, the AIV, or "air tube" was cut, and no longer connected to the downpipe.
The bung hole on the downpipe, circled in red above, obviously had to be capped once the air tube was cut, otherwise a major exhaust leak would exist. I convinced myself that my car ran the same without the AIV from my knowledge of the system, and the fact that I drove my Z for a long time with the air tube cut as above. Then I disconnected the AIV solenoid from the electrical harness under the hood, and the engine still ran perfectly. This led me to believe that my car would run the same without the AIV system.
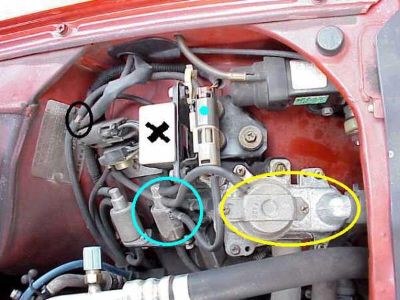 Front left corner under hood. Yellow circle is the AIV. Blue circle around AIV solenoid. Black X is boost sensor. Black circle is vacuum T shared by AIV and boost sensor. Blue dot is where the electrical engine harness connects to the AIV solenoid. Front left corner under hood. Yellow circle is the AIV. Blue circle around AIV solenoid. Black X is boost sensor. Black circle is vacuum T shared by AIV and boost sensor. Blue dot is where the electrical engine harness connects to the AIV solenoid.
Disconnect the electrical engine harness for the AIV solenoid at the blue dot. Front of car is to the right.
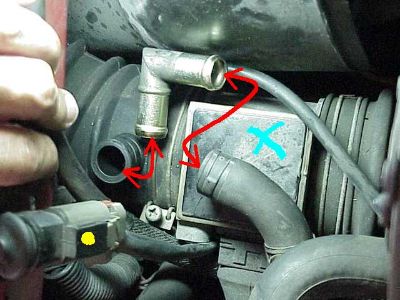 Front of car is now toward the left of the picture. Disconnect the AIV hose at the air intake, just in front of the MAS. The MAS is marked with a blue X. Front of car is now toward the left of the picture. Disconnect the AIV hose at the air intake, just in front of the MAS. The MAS is marked with a blue X.
The open hole shown above in the intake has to be capped or engine will be sucking unfiltered atmosphere.
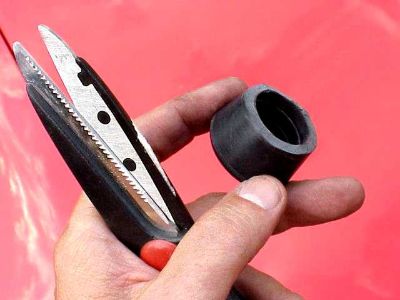 This is a one-inch diameter, rubber furniture leg cap, trimmed down a quarter inch or so in height. This capped the hole in the intake perfectly. This is a one-inch diameter, rubber furniture leg cap, trimmed down a quarter inch or so in height. This capped the hole in the intake perfectly.
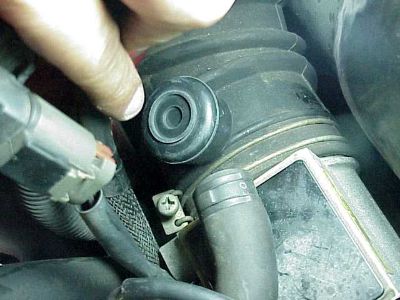 I used a little black RTV silicone to seal the rubber cap onto the old AIV connection at the air intake. The fit was excellent. I used a little black RTV silicone to seal the rubber cap onto the old AIV connection at the air intake. The fit was excellent.
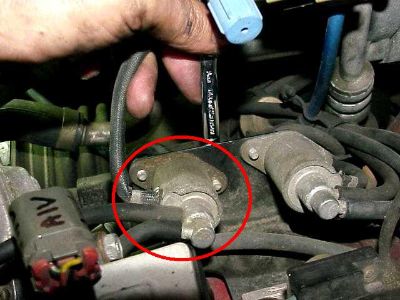 Unbolt the two 8mm bolts holding the AIV solenoid onto this bracket. The front of the car is to the left. I love my stubby Gear wrenches. Unbolt the two 8mm bolts holding the AIV solenoid onto this bracket. The front of the car is to the left. I love my stubby Gear wrenches.
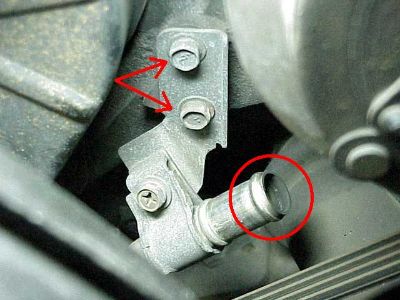 Remove or cut the hose connecting the AIV to the air tube at the front of the engine. That is the A/C compressor in the RU corner and the fan shroud in the LL corner. Remove or cut the hose connecting the AIV to the air tube at the front of the engine. That is the A/C compressor in the RU corner and the fan shroud in the LL corner.
The other end of this long, rigid tube was connected to the exhaust under the car, as shown in the first pic.
Once the air tube is disconnected from the exhaust and the AIV, it will lift up an out the front of the engine,. Remove the two bolts by the arrows in the above pic and do some creative wiggling.
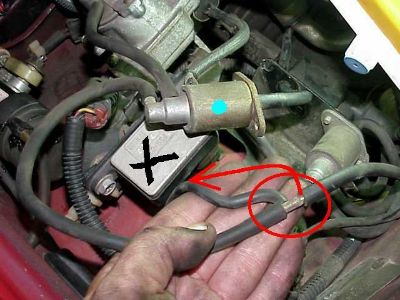 The boost sensor under the black X still needs a vacuum supply. Quickest way is to cap the part of the T connector that was leading to the AIV solenoid and reuse the original hose. The boost sensor under the black X still needs a vacuum supply. Quickest way is to cap the part of the T connector that was leading to the AIV solenoid and reuse the original hose.
There were three bolts holding the AIV onto its mounting bracket. Remove the bolts and pull the AIV, solenoid and hoses out of the car, preferably as one unit. The boost sensor will be left behind on the same bracket to which the AIV was connected.
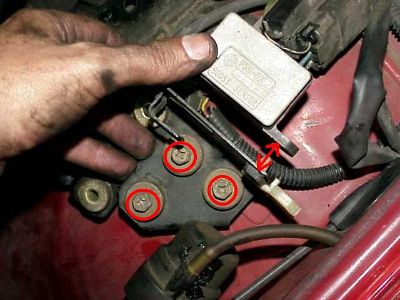 I chose to remove the boost sensor from the bracket, and then pull the black bracket, by unscrewing the three 11mm bolts circled in red. I relocated the boost sensor a few inches. I chose to remove the boost sensor from the bracket, and then pull the black bracket, by unscrewing the three 11mm bolts circled in red. I relocated the boost sensor a few inches.
The boost sensor is what gives a reading to the stock boost gauge in the dash.
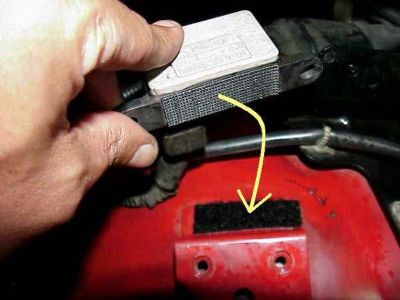 I used industrial strength Velcro to stick the boost sensor back onto the fender well after the mounting bracket above was removed. I used industrial strength Velcro to stick the boost sensor back onto the fender well after the mounting bracket above was removed.
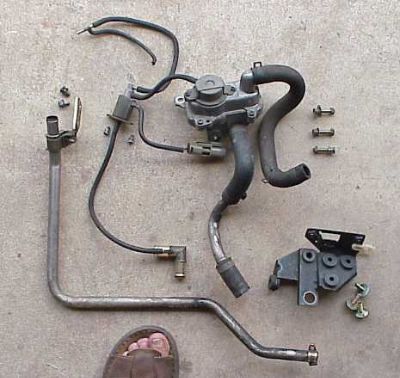 The entire AIV system out of the car. The full length of the air tube, in the left lower corner, is now revealed. The entire AIV system out of the car. The full length of the air tube, in the left lower corner, is now revealed.
 Here is a review of how things looked before the AIV delete, Here is a review of how things looked before the AIV delete,
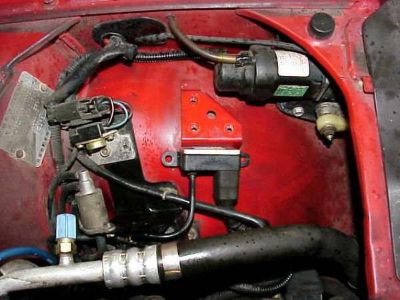 and after the AIV delete. A LOT more room :c) and a lot less junk and vacuum hoses. The boost sensor is in the middle of the pic, on its side. and after the AIV delete. A LOT more room :c) and a lot less junk and vacuum hoses. The boost sensor is in the middle of the pic, on its side.
Now I can change a driver's headlight bulb without cutting my hand.
| 